Hey there, fellow foodies and home enthusiasts! Have you ever looked at your overflowing fridge and felt that pang of guilt as fresh produce slowly wilts away?
I certainly have, and it always gets me thinking about how our ancestors managed to make every harvest last. It seems like more and more of us are rediscovering the incredible satisfaction and wisdom in those age-old techniques.
From canning summer’s bounty to fermenting gut-friendly goodness, these methods aren’t just for survival anymore; they’re a vibrant way to reduce waste, eat healthier, and connect with our culinary heritage.
Let’s find out more right now!
The Art of Fermentation: Beyond Sauerkraut

There’s something truly magical about fermentation, isn’t there? It’s not just about making food last longer; it’s about transforming humble ingredients into something utterly new, bursting with complex flavors and incredible health benefits.
I remember my first dive into fermenting. I started with a simple batch of sauerkraut, and honestly, I was terrified I’d mess it up and grow something fuzzy!
But watching those cabbage leaves slowly transform, bubbling away on my counter, was an eye-opening experience. The crunch, the tang – it was nothing like the store-bought stuff.
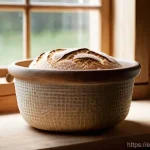
Since then, my fermenting journey has taken me through tangy kombucha, fiery kimchi, and even homemade sourdough. It’s a culinary adventure that genuinely enriches my kitchen and my gut.
What I’ve learned is that it’s less about strict rules and more about understanding the process and trusting your senses. Don’t be afraid to get a little wild and experiment with different vegetables or spice blends; that’s where the real fun begins and you discover your signature flavors.
Unlocking Gut Health & Flavor Bombs
For me, the biggest draw of fermentation is undoubtedly the incredible boost it gives to my gut health. We’re talking about live, beneficial bacteria that aid digestion, enhance nutrient absorption, and just make you feel generally better.
But let’s be real, the flavor profile is a huge win too! Think about the deep, umami notes in a good miso, the vibrant zing of homemade pickles, or the subtle effervescence of a perfectly brewed kombucha.
These aren’t just snacks; they’re flavor bombs that elevate any meal. When I first tried making my own kombucha, I was amazed at how customizable it was.
You can infuse it with fruits, herbs, or spices to create endless variations. It’s a fantastic way to cut down on sugary drinks and introduce a genuinely healthful and delicious alternative into your daily routine.
The initial investment is minimal – mostly just jars and some good quality ingredients – and the return in terms of taste and well-being is enormous. Trust me, once you taste homemade, you’ll never go back!
Essential Tools and Troubleshooting Tips
You might think fermenting requires a science lab, but honestly, it’s surprisingly low-tech. For most vegetable ferments, all you really need are glass jars, some lids, and maybe some fermentation weights to keep everything submerged.
I started with just a few Mason jars and quickly expanded my collection. If you’re getting serious, airlocks can be a great addition to prevent oxygen exposure, but they aren’t strictly necessary for many ferments.
My best advice for troubleshooting? Don’t panic if you see a bit of white film on top – it’s often kahm yeast, which is harmless, not mold. Mold usually looks fuzzy, green, or black.
Always trust your nose; if it smells truly foul, it’s best to toss it. Temperature is also key; most ferments do best at room temperature, but extreme heat or cold can slow things down or encourage undesirable bacteria.
My personal rule of thumb is to start small, follow reliable recipes, and don’t be afraid to ask for advice in online communities. We’ve all had a batch go wrong, but that’s how we learn!
Canning & Jamming: Sweet & Savory Treasures
Ah, canning. It’s a tradition that truly connects us to our grandmothers and great-grandmothers, isn’t it? I have vivid memories of my own grandmother’s kitchen, steaming with the sweet aroma of berries and sugar, countless jars lined up on the counter like edible jewels.
There’s a profound satisfaction in seeing rows of homemade preserves gleaming in your pantry, each one holding a piece of summer’s sunshine. For me, canning isn’t just about putting food away; it’s about celebrating the bounty of the season and capturing those fleeting flavors to enjoy months later.
Whether it’s chunky apple sauce, tangy tomato salsa, or vibrant strawberry jam, the process is therapeutic, and the results are incredibly rewarding. It’s also an amazing way to deal with an overflowing garden harvest or those incredible deals you find at the farmers’ market.
Imagine having homemade tomato sauce for pasta in the dead of winter, or a dollop of peach preserves on your morning toast. It’s pure comfort and convenience, all rolled into one beautiful jar.
Plus, homemade gifts? Always a hit!
From Garden to Jar: Sealing Summer’s Bounty
When the garden is bursting with tomatoes, berries, or stone fruits, canning becomes a joyful necessity. There are two main methods I rely on: water bath canning for high-acid foods like fruits, jams, jellies, and pickles, and pressure canning for low-acid vegetables, meats, and soups.
My first venture into water bath canning was with strawberry jam, and let me tell you, the sense of accomplishment when those lids sealed with that satisfying “pop!” was immense.
Pressure canning can seem a bit intimidating at first, but with a good quality pressure canner and careful attention to safety guidelines, it opens up a whole new world of home-preserved savory meals.
It’s about understanding the science behind it – creating a vacuum seal that keeps harmful bacteria at bay. I always make sure to use fresh, high-quality produce and follow tested recipes precisely.
Remember, safety first! It means your creations will be delicious and perfectly safe to enjoy all year long.
Elevating Your Pantry with Homemade Goodness
Having a well-stocked pantry of homemade canned goods is like having a secret weapon in the kitchen. Not only does it provide convenient meal starters, but it also allows you to control the ingredients, cutting down on added sugars, salts, and preservatives often found in store-bought versions.
I love turning my homegrown tomatoes into rich marinara sauce, or creating unique fruit chutneys that pair perfectly with cheese and crackers. Last Thanksgiving, I pulled out a jar of cranberry orange relish I’d canned in the summer, and it was such a delightful addition to the meal.
Beyond the basics, think about making spiced apple rings, pickled green beans, or even small batches of experimental fruit butters. These aren’t just food items; they’re little jars of joy that make your meals more flavorful and your pantry more interesting.
It’s truly a testament to the effort you put in, and that personal touch is something you just can’t buy.
Drying & Dehydrating: Ancient Ways, Modern Kitchens
There’s something truly primordial about drying food, isn’t there? It’s one of the oldest preservation methods known to humankind, harking back to days when our ancestors harnessed the sun and wind to make their harvests last through lean times.
And honestly, it’s still incredibly effective and, dare I say, fun! I started experimenting with drying herbs from my garden years ago, simply by tying them in bundles and hanging them in a warm, airy spot.
The intense aroma that filled my kitchen was intoxicating. From those humble beginnings, I’ve moved on to dehydrating fruits, vegetables, and even making my own jerky.
What I adore about drying is how it concentrates the flavors, intensifying the sweetness of fruits or the pungency of herbs. Plus, it drastically reduces the weight and volume of food, making it ideal for storage or for packing on hiking trips.
It’s a method that truly minimizes waste and gives a second life to produce that might otherwise go bad before you can eat it all.
Harnessing the Sun: Natural Dehydration Methods
The sun is a powerful, free dehydrator, and I’ve loved exploring how to use it. Sun-drying is perfect for thin-skinned fruits like grapes (hello, raisins!), certain herbs, and even tomatoes if you live in a hot, dry climate.
The key is to have consistently warm, sunny days with low humidity. I use mesh screens or baking racks elevated off the ground to ensure good airflow and protect against pests.
There’s an incredible satisfaction in letting nature do the work, patiently waiting as the sun slowly draws out the moisture, leaving behind intensely flavored morsels.
Just imagine those sweet, chewy sun-dried tomatoes – they’re so much better than the ones packed in oil! Of course, you need to be mindful of dew at night and any sudden downpours, so bringing your drying racks indoors during those times is a must.
It’s a method that requires a little patience but rewards you with incredibly potent flavors.
Electric Dehydrators: A Convenient Alternative
While I love the romance of sun-drying, let’s be real, not everyone lives in a climate that supports it, or has the time to meticulously monitor outdoor racks.
That’s where an electric dehydrator becomes an absolute game-changer. Investing in a good dehydrator was one of the best decisions I made for my kitchen.
It provides consistent heat and airflow, making the drying process much more reliable and efficient. I’ve dried everything from banana chips and apple slices to zucchini crisps and mushroom jerky.
My kids absolutely devour homemade fruit leathers, which are super easy to make and a much healthier snack than many store-bought options. It’s also fantastic for preserving herbs and making vegetable powders for soups and stews.
Cleanup is usually a breeze, and the ability to set it and forget it (mostly!) means you can preserve large batches of food without a lot of fuss.
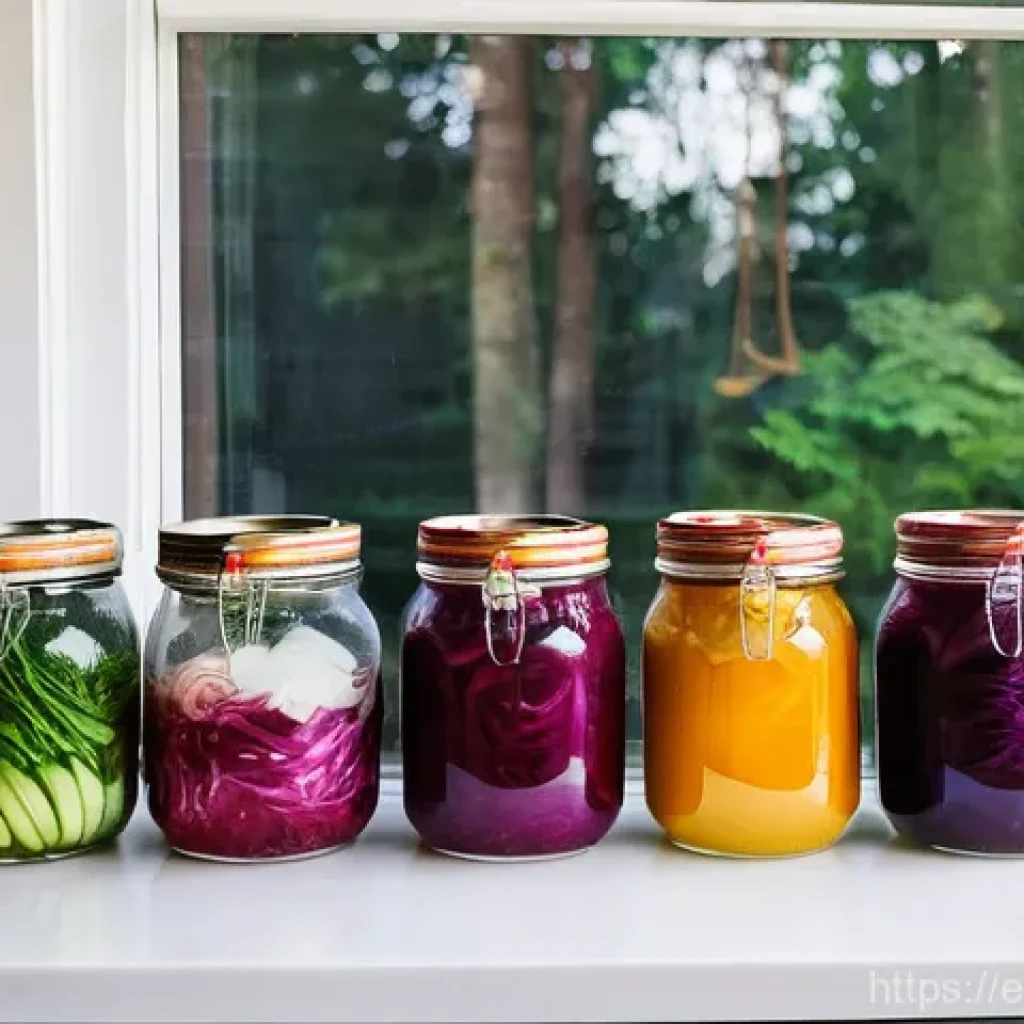
Pickling Perfection: Tangy Triumphs
Pickling, oh, pickling! There’s something undeniably refreshing about a crisp, tangy pickle. It’s a method that’s celebrated across cultures, transforming ordinary vegetables into bright, acidic delights that awaken the palate.
My first foray into pickling was with simple dill cucumbers from a recipe I found online. The process was so straightforward, and the result – those crunchy, briny pickles – was utterly addictive.
Since then, I’ve pickled everything from green beans and asparagus to onions and even eggs! What I love about pickling is its versatility. You can go for a quick, refrigerator pickle that’s ready in a day, or delve into fermented pickles that offer probiotic benefits and a more complex flavor profile.
It’s an incredible way to extend the life of your produce, adding a vibrant zing to sandwiches, salads, or as a standalone snack. Plus, making your own pickles means you can customize the spices and sweetness to your exact liking, creating unique flavors you simply can’t find in a jar from the store.
Quick Pickles vs. Fermented Pickles: A Flavor Showdown
So, what’s the difference between a quick pickle and a fermented pickle? Quick pickles, often called refrigerator pickles, are made by submerging vegetables in a hot brine of vinegar, water, salt, and spices.
They’re ready to eat almost immediately after chilling and offer a bright, acidic snap. They’re fantastic for using up a small surplus of veggies and don’t require any special equipment beyond jars.
Fermented pickles, on the other hand, are a different beast entirely. These rely on lacto-fermentation, where beneficial bacteria convert sugars into lactic acid, creating that signature sour flavor and probiotic goodness.
They take longer, usually a week or more, and develop a more nuanced, complex taste. While quick pickles are delicious, I find myself drawn to the depth and health benefits of fermented varieties.
Both have their place in my kitchen, depending on what I’m craving and how much time I have.
Creative Combos: Beyond the Basic Cucumber
While classic cucumber pickles are always a winner, the world of pickling extends far beyond them. I’ve had so much fun experimenting with different vegetables and spice combinations.
Pickled green beans with a hint of red pepper flakes are amazing in a Bloody Mary or as a side dish. Pickled red onions add a gorgeous color and tangy crunch to tacos and salads.
And don’t even get me started on pickled carrots and cauliflower – they make for an incredibly vibrant and healthy snack. I love to play around with different herbs and spices in my brine: dill and garlic are traditional, but try adding mustard seeds, coriander, peppercorns, bay leaves, or even a touch of turmeric for color and flavor.
You can even pickle hard-boiled eggs for a truly unique snack or appetizer. It’s about letting your imagination run wild and seeing what delicious, tangy triumphs you can create!
Root Cellars & Cold Storage: Nature’s Refrigerators

Before refrigerators became a staple in every home, people relied on clever, natural methods to keep their food fresh through long winters. Enter the root cellar – a brilliant concept that harnesses the Earth’s natural coolness and humidity to create ideal storage conditions.
While most of us don’t have a traditional underground root cellar, the principles behind them are incredibly relevant for modern homes. It’s about finding or creating a cool, dark, and moderately humid space that mimics those natural conditions.
I’ve personally experimented with using the coolest corner of my basement and an unheated pantry, and it’s amazing how much longer certain produce lasts there compared to sitting on the counter or even in the fridge.
This method isn’t just a nod to history; it’s a practical, energy-saving way to extend the shelf life of many fruits and vegetables, keeping them fresh and flavorful without any electricity.
Recreating Ancestral Coolness in Your Home
The magic of a root cellar lies in its stable, cool temperature (ideally between 35-50°F or 2-10°C) and consistent humidity (around 85-95%). These conditions dramatically slow down spoilage, preventing fruits and vegetables from rotting or drying out.
If you don’t have a basement, consider an unheated garage, a cool closet on an exterior wall, or even an insulated outdoor storage shed. The goal is to minimize temperature fluctuations and keep it dark, as light can encourage sprouting.
I’ve found that apples, potatoes, onions, carrots, and winter squash all do incredibly well with this type of storage. For root vegetables like carrots and parsnips, I often layer them in bins with damp sand or sawdust to maintain humidity and prevent them from shriveling.
It’s a simple, low-tech solution that yields fantastic results and makes you feel connected to those resourceful generations before us.
Simple Storage Solutions for Every Space
You don’t need a massive, dedicated root cellar to benefit from cold storage principles. Even a small, cool corner can make a difference. For potatoes and apples, I use breathable crates or baskets to allow for good air circulation, and I always store them separately, as apples release ethylene gas which can cause potatoes to sprout faster.
Winter squash and pumpkins prefer slightly warmer, drier conditions than root vegetables, so a shelf in a cool pantry often works perfectly. For smaller quantities, even a well-ventilated cabinet in a cooler part of your kitchen can extend the life of some items.
The key is to keep things off the floor, away from direct sunlight, and to check your produce regularly, removing any spoiled items before they can affect the rest.
It’s all about creating the right environment for each type of food, and with a little creativity, you can achieve amazing results.
Salt Curing & Smoking: Robust Flavors, Extended Shelf Life
There’s a certain rugged charm to salt curing and smoking, wouldn’t you agree? These methods evoke images of ancient hearths and bustling markets, where artisans transformed perishable goods into culinary treasures that could last for months.
I’ve always been fascinated by how simple salt, when used correctly, can draw out moisture and inhibit spoilage, totally changing the texture and flavor of meats and fish.
My first attempt at curing bacon at home was a revelation – the depth of flavor, the perfect balance of salt and smoke, was beyond anything I’d ever bought.
And smoking? The aroma alone is enough to get my taste buds tingling. It’s a method that adds incredible complexity and character, whether you’re smoking cheese, nuts, or a beautiful piece of salmon.
While these techniques might seem a bit more involved, the payoff in terms of unique flavors and extended preservation is absolutely worth the effort.
The Magic of Salt: From Fish to Bacon
Salt curing is truly one of the oldest and most fundamental forms of food preservation. Historically, it was a lifeline, allowing communities to store protein without refrigeration.
The science is elegant: salt draws out water through osmosis, creating an environment where spoilage-causing microbes simply can’t thrive. Beyond just preserving, salt also transforms the texture and flavor.
Think of the delicate flakes of salt-cured cod, or the rich, dense texture of a perfectly cured prosciutto. My own journey into salt curing began with a simple batch of homemade gravlax – salmon cured with salt, sugar, and dill.
The process was surprisingly easy, and the resulting vibrant, flavorful fish was an absolute showstopper. It’s incredible how these humble ingredients can create such a profound change.
You control the amount of salt and the flavorings, allowing you to create truly personalized and delicious results right in your own kitchen.
Adding Smoky Depths: Home Smoking Basics
Smoking adds another incredible layer to the preservation and flavor profile of food. There’s nothing quite like the savory, aromatic essence that permeates everything from fish and poultry to cheeses and even vegetables.
While a dedicated smoker is fantastic, you don’t necessarily need one to get started. I’ve experimented with simple setups using a grill with wood chips in a foil packet, creating enough smoke to infuse a beautiful flavor into chicken or pork.
There are two main types of smoking: cold smoking, which imparts flavor without cooking (great for cheese and cured meats), and hot smoking, which cooks the food while flavoring it (perfect for ribs, brisket, or salmon).
The key is choosing the right wood – hickory for strong flavor, apple or cherry for a sweeter, milder smoke. The first time I smoked my own salmon, the rich, buttery texture and the subtle smoky notes were simply divine.
It’s a process that builds character, both in your food and in your culinary skills!
Making the Most of Every Morsel: Zero Waste Approaches
In our busy lives, it’s all too easy to let good food go to waste. We buy with the best intentions, but then life happens, and that fresh produce wilts in the fridge.
That pang of guilt? I know it well! But what if we shifted our mindset, adopting some of these traditional preservation techniques not just for survival, but as a deliberate step towards a more sustainable, zero-waste kitchen?
It’s about respecting our food, making the most of every single morsel, and cutting down on our environmental footprint. These age-old methods aren’t just about extending shelf life; they’re about maximizing flavor, nutrient density, and truly appreciating the food we bring into our homes.
It’s a powerful way to connect with our culinary heritage while making a tangible difference in reducing food waste, which is something I’m incredibly passionate about.
Every small step we take to preserve and cherish our food contributes to a larger, more sustainable way of living.
Smart Kitchen Habits for Less Waste
Beyond active preservation, cultivating smart habits in the kitchen can dramatically reduce waste. Meal planning is a huge one for me; knowing exactly what I’m cooking helps me buy only what I need.
Proper storage is also critical. Understanding which fruits and vegetables prefer the fridge, the counter, or a cool pantry can extend their life significantly.
For instance, storing onions and potatoes separately, or keeping tomatoes out of the fridge, makes a big difference. I also make it a point to use up scraps: vegetable trimmings become delicious homemade stock, fruit peels can be dried for tea or infused vinegar, and stale bread transforms into croutons or breadcrumbs.
It’s all about looking at what we might typically discard as a potential ingredient rather than trash. These small shifts in perspective can lead to huge reductions in waste over time, saving you money and helping the planet.
Your Preservation Toolkit: A Quick Guide
To help you visualize some of these fantastic methods, I’ve put together a little guide on what each technique is best suited for. This isn’t exhaustive, of course, but it gives you a great starting point for integrating these wonderful preservation arts into your own kitchen.
Think of it as your cheat sheet for becoming a food preservation pro! Knowing which method works best for different types of food can really streamline your efforts and maximize your success.
| Preservation Method | Best For | Key Benefit | Beginner-Friendly? |
|---|---|---|---|
| Fermentation | Cabbage, Cucumbers, Dairy, Grains | Probiotics, Unique Flavor | Yes (Sauerkraut) |
| Canning (Water Bath) | High-Acid Fruits, Jams, Pickles | Long-Term Storage, Pantry Staple | Yes (Jams) |
| Drying/Dehydrating | Herbs, Fruits, Vegetables, Jerky | Lightweight, Concentrated Flavor | Yes |
| Pickling | Cucumbers, Onions, Green Beans | Tangy Taste, Quick Preservation | Yes |
| Cold Storage | Potatoes, Apples, Squash, Root Veg | No Energy Needed, Freshness | Yes |
Embracing these methods is more than just a trend; it’s a return to mindful living and a celebration of flavor and self-sufficiency. So, what are you waiting for?
Let’s get preserving!
Closing Thoughts
It’s truly incredible, isn’t it, how these ancient traditions of food preservation can bring so much joy and meaning to our modern kitchens? From the vibrant tang of a fermented pickle to the sweet comfort of homemade jam, each method connects us to a richer culinary heritage and a more sustainable way of life.
I hope this journey through fermentation, canning, drying, pickling, cold storage, and curing has sparked your imagination and given you the confidence to dive into these rewarding practices yourself.
It’s more than just food; it’s about savoring every season, minimizing waste, and creating something truly special with your own hands.
Useful Information to Know
1. Always Start with Quality Produce: The success of any preservation method heavily relies on the freshness and quality of your ingredients. Using ripe, unblemished fruits and vegetables will not only yield better flavors but also reduce the risk of spoilage. Think of it as building a strong foundation for your culinary masterpiece. I’ve learned this the hard way with slightly past-their-prime berries for jam – it just doesn’t taste as vibrant! Investing in good produce, perhaps from a local farmers’ market, is truly worth it, ensuring your efforts result in the most delicious outcomes possible. It’s a difference you can genuinely taste.
2. Sanitation is Your Best Friend: Especially when canning and fermenting, cleanliness cannot be overstated. Sterilizing jars, lids, and all your tools prevents undesirable bacteria and molds from taking hold, ensuring your preserved foods are safe and delicious. Trust me, a little extra time spent on proper sanitation saves a lot of heartache (and wasted ingredients) down the line. It’s a fundamental step that I never skip, and neither should you. Proper cleaning protocols are the silent heroes behind every perfectly preserved jar in your pantry, keeping your food safe and extending its shelf life beautifully.
3. Follow Tested Recipes, Especially for Canning: While experimentation is fun, stick to tested recipes from reliable sources, particularly for pressure canning. These recipes are developed with safety in mind, ensuring the right acidity levels and processing times to prevent foodborne illness. Once you’re comfortable with the basics, you can start to tweak flavors, but always prioritize safety first. There’s a science to this, and respecting it is paramount. Deviating too much from established guidelines, especially with low-acid foods, can be risky, so it’s always best to build a solid foundation with trusted methods before venturing too far off the beaten path.
4. Embrace the Learning Curve: Don’t be discouraged if your first batch isn’t perfect. We’ve all had ferments go a little funky or a jam that didn’t quite set. It’s all part of the learning process! Each “mistake” is actually a valuable lesson. Keep notes on what you did, what worked, and what didn’t. Over time, your intuition will develop, and you’ll become a true preservation pro. My own journey has been full of delicious successes and a few funny failures, and I wouldn’t trade any of it because each one taught me something new. The joy is truly in the journey, not just the perfectly sealed jar.
5. Proper Storage After Preservation Matters: Once preserved, store your creations in a cool, dark place away from direct sunlight and extreme temperature fluctuations. This helps maintain quality and extends shelf life. Jams and canned goods do best in a pantry, while fermented items might prefer a slightly cooler spot. Labels are also super important – clearly mark what’s in the jar and when it was made! This keeps your pantry organized and prevents any “mystery jar” surprises later on. Proper storage is the final, crucial step in ensuring all your hard work pays off, allowing you to enjoy your delicious homemade goods for months to come.
6. Get Creative with Flavor Combinations: Beyond the traditional, think outside the box! Add unique spices to your pickles, infuse your kombucha with seasonal fruits, or try smoking different kinds of nuts. The beauty of home preservation is the freedom to customize and create truly unique flavor profiles that cater to your personal taste. I’ve discovered some of my favorite culinary combinations just by being a little adventurous, like adding a touch of star anise to apple butter or chili flakes to pickled carrots. Don’t be afraid to experiment – that’s where the real magic happens in your kitchen!
Key Takeaways
Diving into the world of food preservation is genuinely transformative, offering so much more than just extending the life of your ingredients. It’s about building a deeper connection with your food, understanding where it comes from, and actively participating in its journey from farm to table. By embracing methods like fermentation, canning, drying, and pickling, you’re not only creating delicious, wholesome foods but also reducing waste and becoming more self-reliant in your kitchen. I’ve found that this journey fosters a wonderful sense of accomplishment and culinary creativity that simply can’t be replicated by store-bought goods. It empowers you to control the quality of what you eat, experiment with incredible flavors, and truly savor the bounty of each season. This isn’t just a fleeting trend; it’s a return to mindful, sustainable living that enriches both your pantry and your soul, making every meal a celebration of your own resourcefulness. So, take that first step – whether it’s a simple batch of pickles or a foray into homemade sourdough – and experience the magic for yourself, contributing to a healthier planet and a more flavorful plate.
Frequently Asked Questions (FAQ) 📖
Q: Why should I bother with old-fashioned food preservation when I can just hit the grocery store?
A: Oh, I totally get it! In our fast-paced world, it’s easy to think those grandma-approved methods are just for survivalists or serious homesteaders. But let me tell you, rediscovering food preservation has been a game-changer for me, and I think you’ll find it incredibly rewarding too.
First off, imagine saying goodbye to that nagging guilt when fresh produce goes bad in your fridge. Preserving allows you to rescue that bountiful harvest, whether it’s from your garden or a farmers market haul, and enjoy it months later.
It’s a huge win for reducing food waste, which let’s be honest, is something we all struggle with sometimes. Beyond that, it’s a fantastic way to save some serious cash.
Buying fruits and veggies in season when they’re plentiful and affordable, then preserving them, means you skip those crazy out-of-season prices at the grocery store.
And the taste? Oh my goodness. There’s simply no comparison between a store-bought jam and one you’ve made yourself with perfectly ripe, seasonal berries.
You have complete control over the ingredients, meaning no weird preservatives, excessive sugar, or artificial anything – just pure, wholesome goodness.
Plus, there’s a deeply satisfying feeling that comes from connecting with your culinary heritage, just like our ancestors did. It’s empowering to know you’ve stocked your pantry with delicious, healthy food, and honestly, hearing those canning jars “pop” as they seal?
Pure joy!
Q: I’m a complete beginner! Which food preservation methods are easiest to start with, and how do I know they’re safe?
A: That’s an excellent question, and I remember feeling exactly the same way when I first dipped my toes into this world! It can seem a bit daunting with all the different techniques out there, but trust me, some are super approachable for newbies.
My top recommendation for beginners is usually freezing. It requires minimal specialized equipment – mostly just freezer bags or containers – and it’s incredibly versatile for fruits, vegetables, and even cooked meals.
Blanching vegetables briefly before freezing can help maintain their quality, but for many fruits, you can just chop and bag them! It’s how I keep my summer berries tasting fresh all winter long for smoothies and desserts.
Another fantastic entry point is simple fermentation, like making sauerkraut or quick pickles. It sounds fancy, but it’s often as straightforward as chopping vegetables, adding salt, and letting good bacteria do their magic.
There are tons of beginner-friendly recipes that walk you through it step-by-step. As for safety, that’s absolutely paramount. The golden rule is always to use reliable, tested recipes and follow instructions precisely.
Resources like the National Center for Home Food Preservation are your best friends. They provide science-backed guidelines for canning, freezing, and other methods, ensuring your preserved food is safe to eat.
I know from personal experience that sometimes you might be tempted to tweak a recipe, but with preservation, especially canning, it’s vital to stick to the tested methods to avoid any risks.
Once you get the hang of a few basic techniques and understand the safety principles, your confidence will soar!
Q: Is all the effort of home food preservation really worth it in terms of time and resources, or is it just a romantic idea?
A: I hear you loud and clear on this one! I’ve definitely had those moments, especially after a long canning day, where I’ve looked at my kitchen and wondered if I was a little crazy.
But honestly, every single time, I come back to a resounding “Yes, it is absolutely worth it!”Think about it this way: the time you invest now pays dividends later.
You’re not just preserving food; you’re creating a pantry full of wholesome ingredients for quick, healthy meals, reducing your weekly grocery bill, and enjoying peak-season flavors all year.
My family, for example, absolutely adores my homemade tomato sauce. It takes a dedicated afternoon to make a big batch, but knowing I have jars of rich, flavorful sauce for pasta nights or chili for months makes those busy weeknights so much less stressful.
It’s a huge time-saver in the long run! Beyond the practicalities, there’s a deep, intrinsic value. It’s a skill that builds self-sufficiency and resilience, which feels incredibly important in today’s world.
Plus, it’s a wonderful way to connect with your family. I have vivid memories of snapping beans with my grandmother, and now I’m making new ones with my own kids, teaching them where food comes from and the value of preparing it ourselves.
It’s not just about the jar of pickles; it’s about the stories, the tradition, and the empowerment of creating something truly special with your own hands.
The initial learning curve might take a bit of effort, but the rewards—the taste, the savings, the health benefits, and those priceless memories—make every minute worthwhile.